Banner
Variable Speed Fan With Snap Circuits, Kano Computer

In a previous How-To Guide I demonstrated how to blink a Snap Circuits LED with the Kano Computer...

IUPUI researchers use stem cells to identify cellular processes related to glaucoma

INDIANAPOLIS -- Using stem cells derived from human skin cells, researchers led by Jason Meyer...

Pi Day 2016 Project

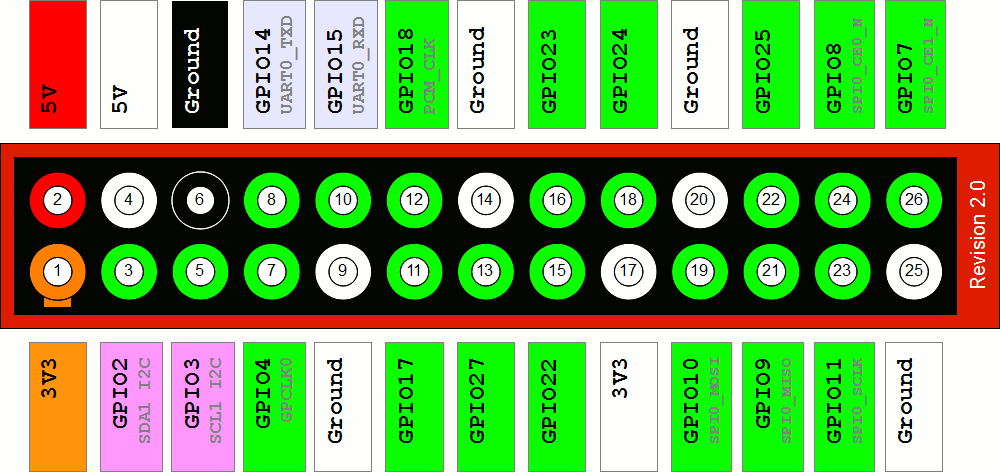
For Pi Day 2016, I’ll demonstrate how to flash a Snap Circuits LED with the Kano Computer (my...

LIGO, Gravitational Waves, And Laser Interferometry

UPDATE: LIGO has detected gravitational waves. ...

When we say "off the grid," we often mean off the power grid.
In my previous blog post, How I Solved My 555 Timer IC Frequency and Built a 555 Guituner, even though I tried several different combinations of resistors in series, I was unsuccessful in finding the correct combination of resistors to achieve the elusive 440Hz. I had to come up with a kludge. I inserted an adjustable resistor (potentiometer) and was able to turn the knob on the potentiometer to tune the circuit to 440Hz to my electronic keyboard.

The problem is mostly likely to do with the tolerance of the resistor. The resistors I used had gold bands and that means they have a tolerance of 5%.

In honor of National Robotics Week 2013 (April 6-14) I am adding this article that I originally posted on my Society of Robots blog page.

In this article you will learn how to build a programmable Snap Circuits Rover by adding a PICAXE micro controller.

In my previous blog post, Build a Simple Tone Generator with the 555 Timer IC, I successfully demonstrated how to build a simple tone generator, but when I tried to demonstrate how to build a guitar tuner, instead of generating a 440Hz tone--a standard tuning frequency for musical pitch, or A4 on your piano--my circuit generated a 369.994Hz tone, or F#4/Gb4.
In my previous blog post, Introduction to the 555 Timer IC , you learned how to build an optical Theremin using a 555 Timer. The original Theremin used radio frequency interference caused by the movement of the player's hand to change the pitch of the instrument. The optical Theremin depends on the intensity of light that falls on a photo resistor also controlled by the movement of the player's hand.

The amount of light that fell on the photo resistor changed the resistance in the circuit. When more light fell on the photo resistor, it reduced the resistance in the circuit and this made the pitch higher. Less light increased the resistance and made the pitch lower.

In this article you will learn how to build an optical theremin using a 555 Timer IC. You will learn the functions of the pins on the 555 chip that are used in this build. You will learn that when the 555 is in astable mode, the output from pin 3 is a continuous stream of pulses called a square wave that can be heard on a speaker as a tone. Finally, after you have built the optical theremin you will learn how to play the instrument.

A theremin is a musical instrument that is played without actually touching the instrument. The original theremin used radio frequency interference caused by the movement of the player's hand to change the pitch of the instrument.