


The Kano is “a computer and coding kit, designed for all ages, all over the world.” It will get “you programming in minutes, with simple blocks that create real code.” It’s designed to “to give young people – and the young at heart – a simple, fun way to make and play with technology, and take control of the world around them.”
Assembling the Kano is very easy and the Kano Book 1 manual has a pictorial step by step guide.


Once you’ve assembled the Kano Computer, connect one end of the HDMI cable to the Kano and the other end to your TV. Plug the Kano into a power outlet and switch your TV over to HDMI input. As the Kano Boots up you’ll see a lot of text scrolling down the screen while the Kano operating system (OS), a flavor of Linux called “Kanux” (maybe sounds like the Vancouver hockey team?) loads up. The Kano will then prompt you for your name.

Next, you’ll be instructed to follow the white rabbit along with some Matrix-like graphics.

Then you’ll be taken through keyboard and mouse activation.

Finally you’ll be taken to the Kano OS desktop.

There are three games apps on the Kano desktop: Snake, Pong, and Minecraft. They are designed to give you an introduction to basic programming by walking you through customizing each game. Snake seemed to be the simplest, Pong had a few more customizing steps, and Minecraft walks you through the customization process using Kano Blocks, a graphical programming language.

Screen shot of Kano Pong app that teaches programming.

Screen shot of Kano Minecraft learning app. It teaches programming with Kano Blocks.
The Kano OS turns learning how to program into a game. As you progress through Snake, Pong, Minecraft, and so on, you earn badges and level up.
Keep in mind that the Kano is so much more than a simple platform to learn how to program. Its computer is a Raspberry Pi running “Raspbian” which is based on Debian (one of the many flavors of Linux) that has been optimized to run on the Raspberry Pi. If you've ever wanted to learn Linux but found it too frustrating to install and configure on a desktop or laptop, Raspbian is already installed and configured for you on the Kano so you are free to poke around and explore Linux. Use the touch pad on the Kano keyboard to point the mouse cursor at Apps.
In the Apps window, scroll down to Terminal and click it to open LXTerminal.

LXTerminal is the Raspbian “terminal emulator,” which is really just a text based way of operating your computer like you may have used on old-timey CRT (Cathode Ray Tube) computers. It’s been a while since I've used UNIX or Linux so I had to poke around going by memory. For example, I tried “cd /etc” and pressed enter and I was able to change to the “etc” directory. Then I typed “dir” and pressed enter and this listed the contents of the “etc” directory.

The Kano Book 2 manual has some suggestions for useful Linux commands to try such as “sudo shutdown -h”

The “sudo” command lets you run Linux commands with “super user” privileges as opposed to running commands with normal user access. The shutdown command does what it says: shuts down the computer so that you can switch it off (or, rather, unplug it from the power outlet). The “-h” option is the “help” switch and it lists the options that are available to you when using the shutdown command.
Another option that you can use with Linux commands is the “-l” switch that, like the “-h” option, lists the available options that you can use with a command. For instance, I typed “sudo –l” and got the following list of options that I could use with the sudo command (notice that “poweroff” is among them):

I typed “sudo poweroff” and pressed the enter key. I was prompted for a password (enter “kano”). The Kano promptly shut down.
Flash an LED—the “Hello world!” of Hardware Hacking
The Raspberry Pi is a popular computer among the Maker/Do-It-Yourself/Hobbyist communities because it can be used to control external devices such motors and get input from sensors such as an ultrasonic range sensor (for instance building a robot with the Raspberry Pi as its brain). I decided to try something vastly simpler: flash a Light Emitting Diode (LED).
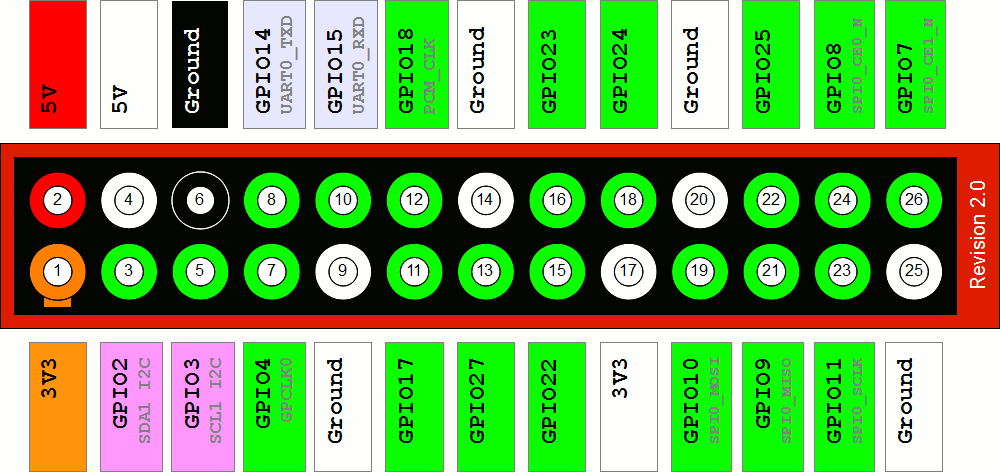
While I had the Kano Computer disconnected from power, I opened the case and connected a Hard Disk Drive indicator LED from an old computer to pin 9 (Ground) and pin 11 (GPIO17) on the Raspberry Pi. Here I should note that you should not try this at home. That is, as with all LED circuits, you should include a current limiting resistor, or you could damage the LED. I was willing to sacrifice my old LED for expedience.

If you used Kano Blocks—the graphical programming language—while customizing Minecraft then you’ll already have some familiarity with Scratch. I connected the power to the Kano and booted it to the Kano OS desktop. To get to Scratch, use the touch pad on the Kano keyboard to point the mouse cursor at Apps. On the code tab scroll down and click Scratch.

I was able to find this web page and followed the instructions to create the following program in Scratch:

I clicked “Sprite1” (the icon of the cat above) according to the instructions, it played the sound file, and…nothing happened. It seems that Scratch is not configured to access the GPIO (General Purpose Input/Output) pins on the Kano Computer.
The Raspberry Pi has been around for a while and there are many resources to help solve most of the problems you may encounter. For example, I was able to find this document that shows you how to install an improved version of Scratch. I didn’t have the Kano connected to wifi so I had to use an old skool method of getting a file from one computer to another called Sneakernet. I removed the Micro SD memory card from SD adapter in the Kano, inserted it into a USB Micro SD reader, walked over to my laptop (in my sneakers—hence the name “Sneakernet”), and inserted the reader into a USB port.

Even though the Kano memory card is Linux, the Kano “/boot” directory did show up on my Windows laptop as my USB drive.
Go to https://github.com/cymplecy/scratch_gpio/blob/V5/install_scratchgpio5.sh and click the “Raw” button to download the “install_scratchgpio5.sh” file (in Chrome it’ll save to your “Downloads” directory). Copy the file from your “Downloads” directory to the Kano Micro SD card. Return the Kano memory card to the Kano Computer and plug the Kano into the power outlet to boot it up.
I had to use the Linux “bash” command to run the install_scratchgpio5.sh shell script. As above, I opened LXTerminal and at the Linux prompt typed:
sudo /bin/bash /boot/install_scratchgpio5.sh
It installed scratchgpio5.sh and some other goodies. To run scratchgpio5 I typed “sudo /bin/bash /home/pi/scratchgpio5/scratchgpio5.sh” and Scratch opened up (it looked identical to the original Scratch program). I recreated the program above, clicked “Sprite1” and the LED flashed on and then off again. In the following video I removed the command to play the sound and added a repeat block to flash the LED over and again:
Flashing a LED is a simple demonstration--nonetheless I’ve barely scratched the surface of what you can do with the Kano Computer.
There are some additional games and apps that do not come preinstalled that you can download here, and some additional projects that you can try here. There is a wealth of information about the Raspberry Pi here.
You are welcome to follow me on Twitter @SteveSchuler20
Comments