


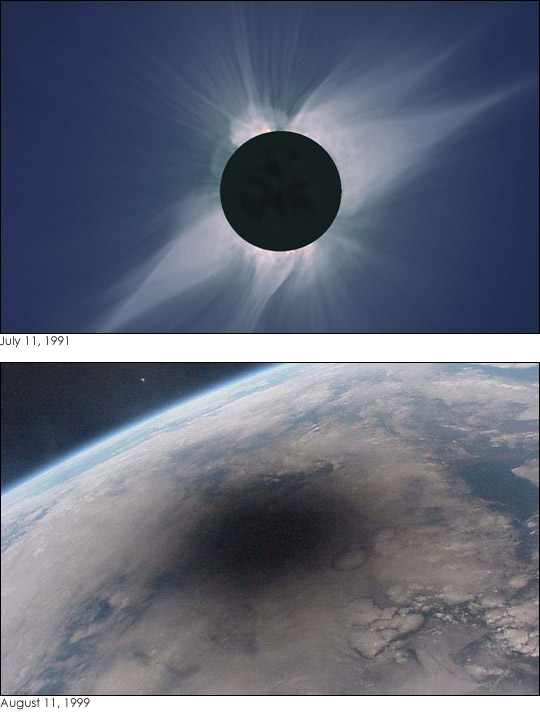
Total solar eclipses take place when the Earth, Moon and Sun are aligned and the shadow of the Moon touches the surface of the Earth. At mid-eclipse, observers within the lunar shadow briefly see totality, where the silhouette of the Moon completely covers the Sun, revealing the beautiful outer solar atmosphere or corona.
On August 1st, 2008 there will be a total eclipse visible from Canada, northern Greenland, Svalbard, the Barents Sea, Russia, Mongolia and China.
People in the British Isles will see a partial solar eclipse, with between 1/10th and 1/3rd of the Sun obscured by the Moon.
At its broadest, in this eclipse the lunar shadow is only 237 km (148 miles) wide but the shadow describes a path thousands of km long, traced out as the Earth rotates. It begins in northeastern Canada, where observers will see the eclipse at sunrise, and then crosses northern Greenland, the Arctic, Barents Sea, Russia and Mongolia before ending in China where the eclipse is visible at sunset.
On the ground the maximum duration of totality is 2 minutes 27 seconds but observers away from the centre of the track and at either end will see a significantly shorter event.
Away from the path of the total eclipse the Sun is only partly obscured by the Moon. This partial eclipse is visible across a large part of the northern hemisphere, including much of Europe and the whole of the UK, where it will take place in the morning.
How to view the eclipse
If you're not near an observatory that can let you safely view it, here are instructions on how to get a look without having the cornea seared out of your eye.
In case it is unclear DO NOT EVER DIRECTLY VIEW THE SUN, EVEN ECLIPSED, WITH THE NAKED EYE. That goes double for binoculars and telescopes.
If you want to make your own, know that safe solar filters should transmit less than 0.003% (density~4.5)[1] of visible light (380 to 780 nm) and no more than 0.5% (density~2.3) of the near-infrared radiation (780 to 1400 nm).
Welder's glasses and other filters
Generally, the Sun can only be viewed directly with special filters, usually having a thin layer of chromium alloy or aluminum deposited on their surfaces
One of the most common filters for safe viewing is shade number 14 welder's glass. An inexpensive alternative is aluminized mylar manufactured specifically for solar observation - don't use those "Space blankets" you bought at Kennedy Space Center or something from your garden.
The ultimate geek alternatives
The most esoteric solar observers will use two layers of black-and-white film that was fully exposed to light and then developed to maximum density. The metallic silver contained in the film emulsion is the protective filter.
Newer black and white films that use dyes instead of silver are not safe, nor are negatives with images on it.
Less photographically inclined geeks can also use CDs as protective filters by covering the central openings and looking through the disk media, though the quality will be poor. Beware: some CDs are made with thin aluminum coatings which are not safe so if you can see through the CD in normal room lighting, don't use it.
The cheapest way - a cardboard pinhole projector
When making a pinhole projector, the best way is with a long box and a piece of white paper and some aluminum foil. The longer the box, the bigger the image, so if you can get one 6 feet, that is perfect. To get an idea of what you will see, multiple the length (in inches) by 0.00873 and that will tell you the size of the image. So at 6 feet you will see an image 0.63 inches in diameter.
You can also tape two boxes together.
Steps:
1) Cut a hole in one end of the box.
2) Tape your aluminum foil over that hole.
3) Poke a small hole in the aluminum foil with a pin.
4) Cut a square hole in the box near the opposite end of the box.
5) Put the white paper at the end of the box opposite the aluminum foil, so you can see it with the hole you cut.
6) At eclipse time, point the aluminum foil end of the box toward the sun. Adjust the box so the sides form no shadows on the paper. The image you see on the paper will be the eclipse.
Too poor for a box?
Assuming you can scrape up a piece of white paper, lay it on the ground. Holding up both of your hands with the fingers overlapping at right angles causes the holes between your fingers to make the pinholes you need.
Happy viewing!
P.S. If you skipped to the end, don't look directly at the sun.


Comments