A small, highly skilled team at Moorfields Eye Hospital transform the lives of people who have lost their eyes to accidents and disease. Each year, they work with their clients to create around 1,400 customized, detailed prosthetics, many of which replace eyes.
Modern prosthetic eyes are far removed from the old misconceptions about ‘glass eyes’, combining modern materials, craftsmanship and artistry in an entirely unique way. In this film, ocularist David Carpenter talks us through the entire process of how a single prosthetic eye is made.
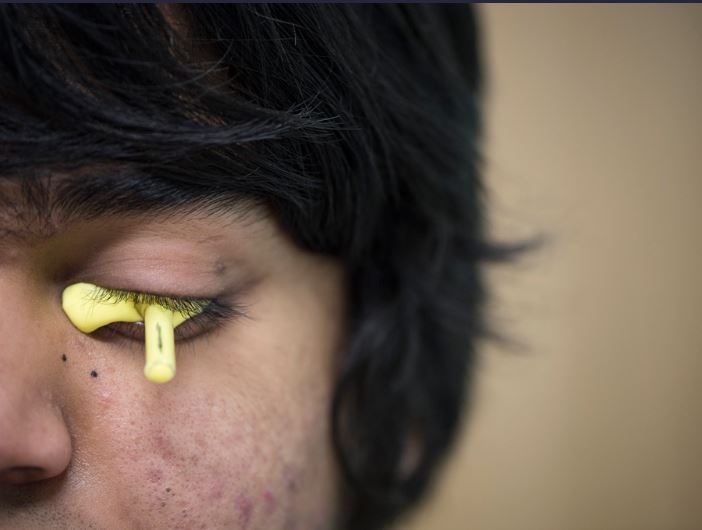
CC-BY: Ben Gilbert/Wellcome Images
David Carpenter: We do various different things, so we do the artificial eyes, which are when they've had the eye removed. We do cosmetic shells, so that sits over an eye that's been damaged and it's shrunk a bit. We do facial prosthesis if they've had the whole of the orbital area removed. And in total we make somewhere in the region of about 1,400 a year.
The first thing we do, the patient obviously will turn up for their appointment, we'll just have a quick chat with them, make sure everything's okay with them health-wise, that they're happy, and then we'll actually start the molding process. So the first thing we need to do is take an impression of the socket. We just put a little impression tray in, it's just like a little plastic tray with lots of little holes in and a little bit of tube that comes out the front and then we mix up an impression cream, so that's an alginate impression cream. And then you squirt that down the tube and it fills up the socket and then sets in less than a minute. And then we can take that out and that gives us the shape of the socket. What we need to then do is go and make up a plaster cast of that impression, so we mix up plaster of Paris, let that plaster set. While that's setting we'll then go off and do some painting of the iris.
What we need to do is measure the iris diameter, so we know what size it is. We paint onto the little black discs that we have in different-sized diameters, so we measure the diameter of their iris and we get the closest-matching black disc. And then we'll paint directly onto that black disc. So we're looking at the patient's colour, then we need to mix the colours to paint those colours onto the black disc to get the correct colour of the iris. We say a blue eye or a brown eye but if you look closely at the eye there's lots of different colours within that eye. So you've got to match all of that, paint all of that, mix up the colours, to get as close a match as possible. Once the plaster's set we can take it apart, take the impression out, and then we need to fill it with wax. We've got a special scleral wax, which is a carvable wax.
We fill up that plaster model with the wax and then we clamp it together and let that cool. So we can take it out of the plaster mould and clean it up, get rid of any rough edges on it, polish it up a little bit, and then we can try that into the socket of the patient to see how it fits.
At that stage we need to see if it's a bit too big, we can carve a bit of the wax off to make it smaller. If it's a bit too small we could add a bit until we're happy that we've got the shape that fits the socket the way we want it to do.
Then what we need to do is mark on the wax where the iris should be. Once we're happy with that, we then need to get our iris colour that we've painted and we glue what we call a cornea unit onto the front of that and that's got the corneal bulge, the dome over the front of it, that magnifies the colour up. And that also has a little peg that comes out the front, which gives us the gaze of the eye, so we can adjust the angle of that until we're happy with the gaze.
Then just wax that painting into the wax so it's all nice and smooth and there's no edges on it. And we need to take that wax shape with the iris and we make up a different plaster cast, so we're using a harder plaster in a metal flask. Once that's set we can take it apart so you've got the two halves, and then you've got the painting with the little peg on it. So you can take that out, remove all of the wax, clean up the painting, and then using the little peg you can insert that back into the hole that it's made, so you're getting that in the right position.
We then mix up the acrylic, the plastic. Once it's ready you can then pack that into the mould, you clamp it under pressure, you heat it overnight and it goes hard, like plastic. Then the next day you can take them out of the flask, then you can polish flat over the iris and add some highlighting to the colour, so it gives it a bit of depth. So we can a bit of extra colour. What we also do on the white of the eye that we've now created, we're going to add some staining onto the eye, because nobody has just a plain white eye, there's a little bit of possibly yellow, brownish staining on there, so we'll add that. And then we'll add the veining onto the eyes as well, so the veins are embroidery thread, red embroidery thread teased out into tiny strands and then you stick that all on the surface.
We let that dry in the oven and then when that's dry we can put that back into our two-part mould, but where we've ground off an even amount all over the front, we're going to replace that with clear acrylics and then we can trim it up, polish it all up so it's all nice and smooth and then it's ready for the patient to come in and be supplied with their artificial eye.
The most satisfying part is patients, when they get their eye. If you've done a good job they're happy, and I know it sounds a bit corny but you've changed their lives. It's – that's, yeah, honestly the best part of it that you know you've helped somebody out.
Film maker: Barry J Gibb, Photographer: Ben Gilbert, Art director: Peta Bell. This story first appeared on Mosaic and is republished here under a Creative Commons license.