


Parts Needed:
1 555 Timer IC
2 Clothespins
1 250 ml beaker
Snap Circuits Parts:
1 Base Grid (11” x 7.7”) # 6SC BG
1 Eight-Pin IC Socket # 6SC ?U8
0.02uF Capacitor # 6SC C1
1 Variable Resistor #6SC RV
1 Whistle Chip # 6SC WC
1 4.5 Volt Battery Holder # 6SC B3
1 Slide Switch # 6SC S1
Jumper Wire 18" (Black) # 6SC J1
Jumper Wire 18" (Red) # 6SC J2
1 Single Snap Conductor # 6SC 01
5 Conductor with 2-snaps # 6SC 02
2 Conductor with 3-snaps # 6SC 03
2 Conductor with 4-snaps # 6SC 04
1 Conductor with 5-snaps # 6SC 05
2 Conductor with 6-snaps # 6SC 05
Build the circuit shown:


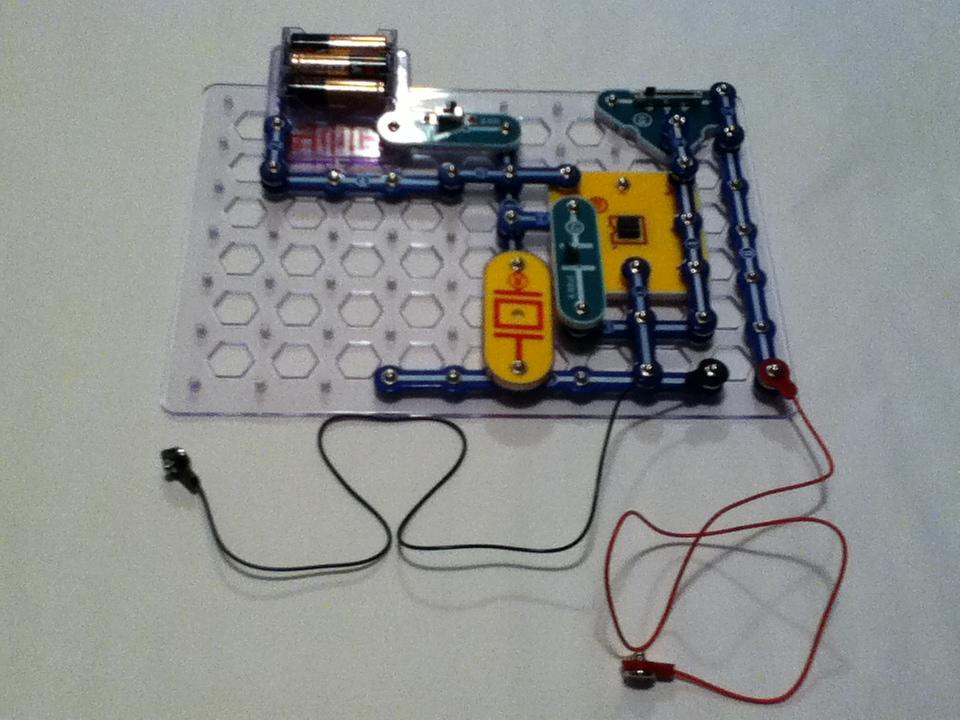
Once the circuit is built, use a clothespin to fasten the end of the red Jumper Wire (that’s not connected to the 555 test circuit) to one side of the beaker. The snap should be reach all the way to the bottom of the beaker. Use the second clothespin to fasten the end of the black Jumper Wire (that’s not connected to the 555 test circuit) to opposite side of the beaker with the snap against the side of the beaker and all the way to the bottom.
Now you can test the conductivity of various solutions. Switch the Slide Switch (S1) on. No sound will be heard on the piezoelectric speaker WC (Whistle Chip). Slowly pour your solution into the cup until the liquid level reaches the red and black snaps of the Jumper Wires inside the cup. This will close the circuit of the 555 test circuit and you will hear a tone on the speaker (WC). When you are finished rinse the beaker and the snaps with distilled water.
First test: precipitation
In this demonstration, I test the conductivity of precipitation. It’s actually melted snow that I collected in a clean bottle, but you can use rain water.
Second test: tap water
In this demonstration, I test the conductivity of ordinary tap water from the kitchen sink.
Third test: distilled water
Funny story. I planned to demonstrate that distilled water does not conduct electricity. I went to a compounding pharmacy to ask if they sold distilled water in smaller volumes than 1 gallon (3.7854 L). They do not, so I asked if I they had distilled water in their lab and the pharmacy tech was kind enough to provide me with about 100 ml of distilled water. And without further ado, here’s the distilled water test:
Well that should not have happened! Since distilled water does not conduct electricity, you should not hear anything on the piezoelectric speaker.
For this article, I wanted to demonstrate first that distilled water does not conduct electricity and then add few grams of table salt (NaCL). When salt is dissolved into water it separates into sodium (Na+) cations and chloride (Cl-) anions. Missing an electron, the sodium ion has a positive charge and the chloride ion having an extra electron, has a negative charge. Opposites attract. The sodium (NA+) cations are attracted to the black snap which is connected to the negative side of the battery. The chloride (Cl-) anions are attracted to the red snap which is connected to the positive side of the battery. This forms a conductive path between the two snaps. Electrons flow into the water from the negative side of the battery through the black snap and are attracted to the sodium ions. The sodium ions pass the electrons to the chloride ions which then flow to the red snap connected to the positive side of the battery. With the circuit closed, you hear a tone on the piezoelectric speaker.
There are a few reasons why the experiment with the distilled water failed. The beaker and snaps may not have been clean. There could have been contaminants in the cough syrup bottle. The pharmacy tech may have given me ordinary tap water by mistake. Anyway, I decided to build my own distillation lab ware and test it when I am able to to generate my own distilled water:

You’ll probably recognize a few of the items in the picture such as the 250 ml beaker, the Erector set ring stand, and the alcohol lamp and stand from this article. The pipette and chip clip (not part of the apparatus) are from my DIY Titration Lab Ware article. The flask is a 250 ml flat bottom Florence flask. The cork is from a Champagne bottle (technically a sparkling wine bottle). The Y-shaped tubing connector courtesy http://dynalon.com/. The rubber tubing is from a stethoscope. The plastic cone is a conical plastic planter. The silver pebbles are courtesy Lab Armor (they are thermal beads to replace water in laboratory baths: http://www.labarmor.com/lab-armor-beads-for-lab-water-baths/).
--------------------
For more information about the Science Play and Research Kit (SPARK):
For more articles regarding SPARK, type "science play and research kit" in the search box above and click the "Go" button.


Comments